Retopo in Blender 2.57
Page 1 of 1
 Retopo in Blender 2.57
This is much easier than you think. The new Blender 2.57 has a completely redisigned interface that is much easier to understand than the old one. This technique is not auto like 3D Coat, but once you learn the controls it is rather easy and fast. But first, to confuse you, I want you to watch this Vid on retopology in the old Blender. Actually its not to confuse you, it's very good information. Pay attention to technique and get the basic idea. Some names, icons and placement of controls have changed, but for the most part it the same. And this is the best vid on the subject. So watch it then come back and move on.
 Blender 2.5 Controls
The first thing to mention here is that by default, you Right Click to select Objects. Left clicking sets the cursor. Its kinda confusing to noobs. In Blender 2.57 you can change this in the User Preferences on the Inputs tab. This will flip-flop the rmb and lmb functions, but then you must remember this when going through tutorials. To me its much easier this way.
Also I should mention that in Blender, the Y and Z Axises are flip-floped. Z is used for Height and Y is forward and back. Nothing here to change, just keep it in mind.
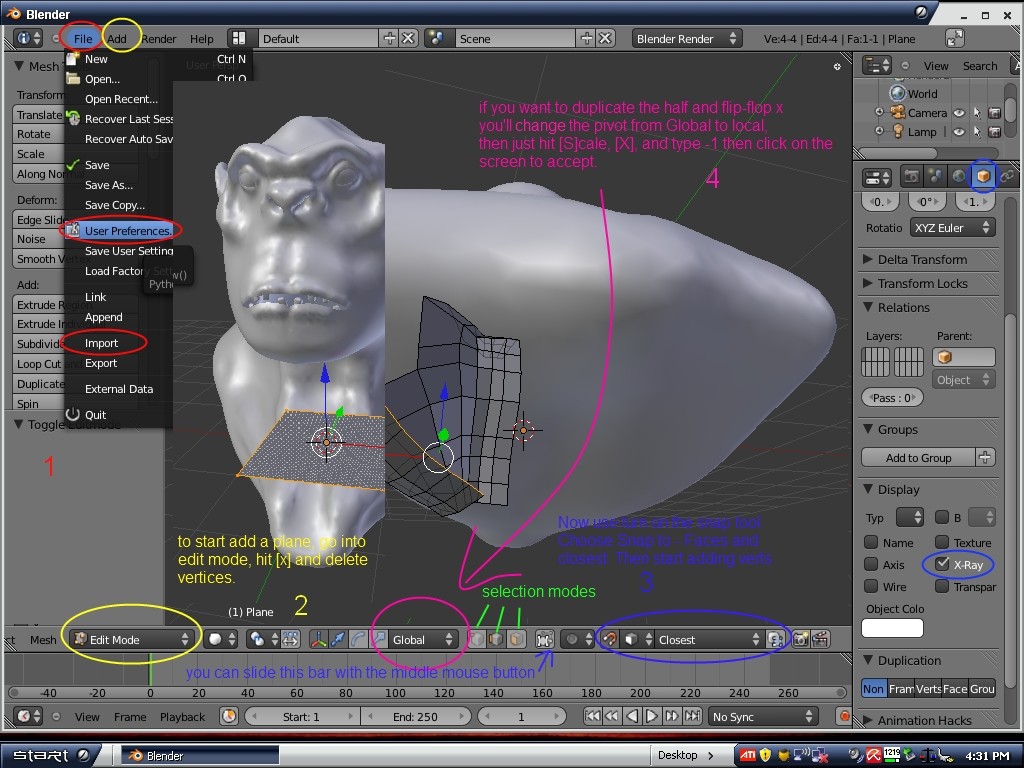
When you import your model it will be Huge, just like in Wings3D, you'll have to zoom out (mmb), Select it, and scale down. Then hit (A) to deselect, and add a plane. Down at the bottom of the 3D-viewport is a bar with a handful of tools and option.You can slide the bar with the (mmb) to show more options. Most of what we need for this project is right here. The first will be to change from Object to Edit mode with only the plane selected. Then hit (x) to delete the veritces of the plane. Now you have an empty object.
In Edit mode, on the right side of the slider bar, is the Snap Tool. Blender did away with the Retopology part but left the Snap Tool, which has the same basic function. So we'll set the Snap tool to Face - Closest, and turn it on. Then we'll use the technique used in the vid. Draw a single vertex by (ctrl)+click on your model. Then hit the (E) key and move your mouse several times to extrude more vertices. Then switch to Edge mode, select some edges (shift+click for 2 or more) and hit (E) to extrude polygons. You should turn on X-ray mode for your new object so you can see your work. You can turn the viewport by dragging with the mmb. You should do this often. Try to keep the area of your work to where the normals are facing closest to the screen (See the Material Study). If you go too far to the sides the polygons will be stretched out. Also be careful not to select Backfacing verts and edges (from the other side). If you move them they'll snap to the side your working on. You can also use (R) rotate and (S) scale. Very useful when extruding several connected edges. I like to do it this way, builds up geometry faster. There are some line draw tools on the menu on the left. I have not tried them, but they should also work with the Snap tool.
Another idea might be to import your model a second time just delete and adjust the mesh as needed. If your already low poly from sculptris, this might be the way to go. Retopology is only needed for animation. Sculptris builds with Triangles (tris), but tris are terrible to animate because the form too many hard edges as they move. Better topology for animation is Quads. a quad can be formed by deleting the connecting edge of two tris. So a Sculptris model could be retoplogized by deleting edges and adjusting whats left!!
Also I should mention that in Blender, the Y and Z Axises are flip-floped. Z is used for Height and Y is forward and back. Nothing here to change, just keep it in mind.
When you import your model it will be Huge, just like in Wings3D, you'll have to zoom out (mmb), Select it, and scale down. Then hit (A) to deselect, and add a plane. Down at the bottom of the 3D-viewport is a bar with a handful of tools and option.You can slide the bar with the (mmb) to show more options. Most of what we need for this project is right here. The first will be to change from Object to Edit mode with only the plane selected. Then hit (x) to delete the veritces of the plane. Now you have an empty object.
In Edit mode, on the right side of the slider bar, is the Snap Tool. Blender did away with the Retopology part but left the Snap Tool, which has the same basic function. So we'll set the Snap tool to Face - Closest, and turn it on. Then we'll use the technique used in the vid. Draw a single vertex by (ctrl)+click on your model. Then hit the (E) key and move your mouse several times to extrude more vertices. Then switch to Edge mode, select some edges (shift+click for 2 or more) and hit (E) to extrude polygons.
 You should turn on X-ray mode for your new object so you can see your work. You can turn the viewport by dragging with the mmb. You should do this often. Try to keep the area of your work to where the normals are facing closest to the screen (See the Material Study). If you go too far to the sides the polygons will be stretched out. Also be careful not to select Backfacing verts and edges (from the other side). If you move them they'll snap to the side your working on. You can also use (R) rotate and (S) scale. Very useful when extruding several connected edges. I like to do it this way, builds up geometry faster. There are some line draw tools on the menu on the left. I have not tried them, but they should also work with the Snap tool.
 Another idea might be to import your model a second time just delete and adjust the mesh as needed. If your already low poly from sculptris, this might be the way to go. Retopology is only needed for animation. Sculptris builds with Triangles (tris), but tris are terrible to animate because the form too many hard edges as they move. Better topology for animation is Quads. a quad can be formed by deleting the connecting edge of two tris. So a Sculptris model could be retoplogized by deleting edges and adjusting whats left!!
 UV-mapping
Once your happy with your model you'll need to UV-map it. Here's a short vid on that.
Then you'll want do a Bake to Transfer your textures, Blender can do both. But thats another tutorial.
Then you'll want do a Bake to Transfer your textures, Blender can do both. But thats another tutorial.
Page 1 of 1
Permissions in this forum:
You cannot reply to topics in this forum